I made a video documenting our progress to date on our winter greenhouse. Check it out. Also check out my youtube channel, NorthlandPhoenix

I made a video documenting our progress to date on our winter greenhouse. Check it out. Also check out my youtube channel, NorthlandPhoenix

Hi there,
I just got back from Montevideo, where we were working on our greenhouse. We were very lucky to have our good friend Anna as an extra helper this weekend and we had no qualms about putting her to work. We’re glad to have her help as temperatures in the greenhouse hovered around 100 degrees F. What we were working on was the beginning of insulating our walls, which is starting to look daunting as I can only imagine the temperatures increasing as we add insulation. Our ventilation has been minimal up until now, but soon we’re going to have to get the proper fans installed to making working in there tolerable. It was a bright sunny day, and I can imagine how nice it will be to be in there on a cold sunny winter day.
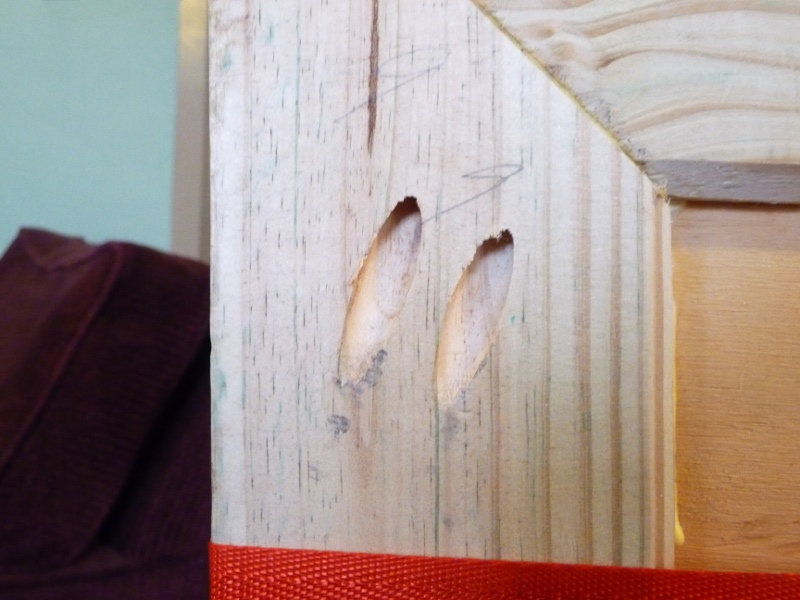
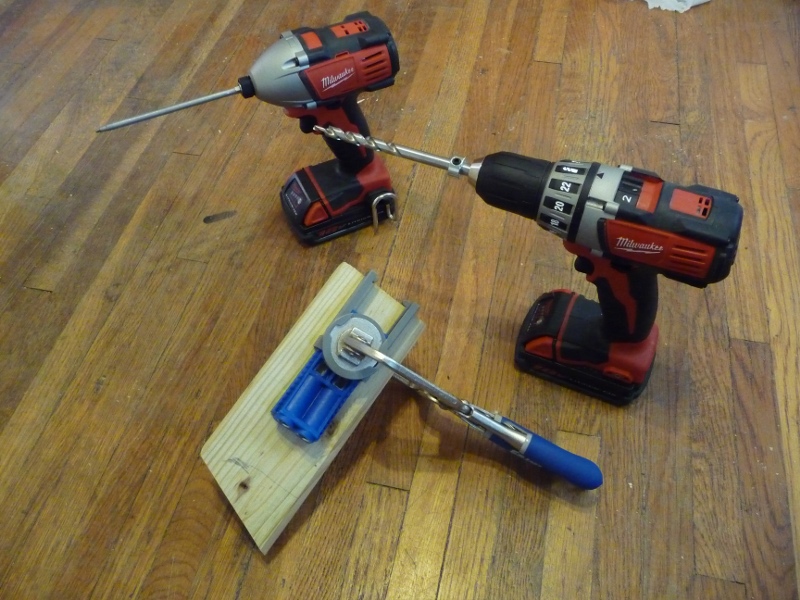
First we stuffed the gaps with insulation. We used two layers of R-11 insulation which is meant for 2×4 studs. This is a bit of a no-no as you loose some insulation value when you overstuff the insulation, but we have a bunch of it laying around thanks to my Grandfather, and it makes to much sense to just use it anyway. We covered it with vapor barrier (plastic sheets) and sealed all the seams with some Tyvek tape we had laying around. Then we cut some 3/8” plywood to fit the space, which takes some patience, because our concrete pad isn’t perfectly level. Anna and Michelle really went to town on this and did most of the work. It was really nice having the separate drill and driver as Anna could predrill a small hole and Michelle could follow right behind and drive the screw in. Predrilling really seems to make it easier. You only have to drill a really shallow hole to give the screw something to bite into. Another thing which makes life easier is Torx head screws and bits. They just work. The only issue I had is that after a day of work, the regular grade bits we were using ended up twisting under the torque of the impact driver (see picture below). I ordered a 25 pack of the Milwaukee Shockwave bits (T25) which are designed for impact driver use and we’ll see if they hold up better. If not at least, I’ll have a bunch of replacements.
Given the heat inside the greenhouse, we could only spend so much time in there, so we also got some external work done. I put in some framing for where our ventilation is going to go. Michelle and I put some screws into our external siding to help hold it in place better. Anna used a grinder and ground down some bolts in the concrete that used to be used for some fencing, but now are just in the way. My Mom put some primer on the siding. The thing I’m most happy with (besides the wall we finished) is that we (my grandfather and I) solidified our plan for finishing the end walls. I was putting off doing the walls for a while because I didn’t understand how it all was going to fit together at the top where the insulated portion of the wall intersects the glazing, but we hashed out a plan. Knowing where we are going really helps the process along as a lot of our time is spent figuring out how to do everything, but once we get going we can move at a brisker pace. I feel like I’m learning an incredible amount of stuff about construction that I never would have gotten had we not undertaken this project and for that I’m very grateful.
Update on Reese
Another thing I’m very grateful for is that my boxer Reese has been making incredible strides lately. We got Reese a year and a half ago as a rescue from Minnesota Boxer Rescue and he came with some issues such as fear of men and some weird form of dog aggression that was in-between overaggresive playing and fear based aggression that would often end in a fight. A month or two ago, Reese and Honey (my sister Nikole’s dog) became friends. This past Thursday, we went over to my friend John’s house and he played with Hilde. This weekend, Reese successfully coexisted with my mom’s dogs, Cody and Sadie, both of whom have been very defensive around Reese. While, I wouldn’t say they played together, they definitely were in each other’s company without having to be on leashes and with out constant supervision. I’m really grateful for this.
We’ve been very conscious in our actions heading in this direction. Here are some things that we’ve found have helped. First, it’s important to know your dog’s limits and only put them in situations where they will most likely succeed. Secondly, be patient and kind with them, even when they fail. Lastly, we’ve found that loading Reese up with his doggy backpack helps weigh him down and slow him down significantly and that helps other dogs accept him when his high energy and over-exuberance would put them on the defensive otherwise.


A short while ago, we hung up the door we built earlier. Check out the gallery below for some pictures. Also, we got some goodies in the mail that we’ll get a lot of use out of in the near future.


Picture is from a recent stroll through our neighborhood in Minneapolis. We’ve really been enjoying the flowering trees this year. They look and smell amazing.
This past weekend we spent on my mom’s farm building the exterior door for the greenhouse. For the interior door, we just salvaged a normal door and frame, however the location where the exterior door goes is an unusual shape which required a custom door. Completing this door is very exciting for everyone, because it means that the greenhouse is completely enclosed, so it will start retaining more heat throughout the day.
This project was very doable, but required a certain amount of patience and precision. I wouldn’t recommend it for the DIYer who just hacks stuff together, but those who take the time to make sure everything is just right will have no real problems. Our door is unique in that the opening it’s going in is the least standard opening it could possibly be, so our challenges are a bit greater than what would be typical. The top is at a 45 degree angle since the roof is so low, and the bottom is also at an angle since the cement there is cracked and unlevel. Our door is a solid wooden door made out of the same siding as the rest of the greenhouse surrounded by a 2×4 frame.
The project started out at Nikole and Brad’s house, where they bought some 2×4’s and routed a channel down the center of the board to hold the interior panel. Then they routed a bevel on each side of the channel for decoration. They made each of the boards a foot longer than need be to allow us room for cutting. At the same time, my mom and grandfather trimmed the door frame.
Michelle, Reese, and I brought the routered 2x4s from the Twin Cities down to my mom’s farm. It was a tight fit in my little Saturn, but we all made it even though Reese grumbled a bit for not having the full back seat to lay down in. The first thing we had to do when we got there was to adjust the door frame, by adding some shims between the stud and the door frame where the door hinges would be mounted. The stud has a little twist in it at the bottom, so the shims helped straighten the door frame out. It is absolutely essential that the door frame be as straight as possible, because when you attach the door to a crooked door frame, it will bind when swung. This puts unnecessary stress on the door, hinges, frame, and user.
The next thing we did was to cut all the pieces of the frame to length and miter the corners. I would normally discourage people from mitering doors. Most doors aren’t mitered and for me it adds some unnecessary complexity to the process. For us, mitering seemed to be the best option, because all the other options seemed really hokey. The bottom of our door is 1 ½ inches higher on one side than the other. We contemplated shaving the bottom of the door to match the opening and decided against that because of aesthetics. We thought about adding a spacer under the sill board which would be harder to cross with a loaded wheel barrow. It also seemed more difficult than just building the door to fit the opening. To determine the angles for the miters, we cut samples out of scrap wood and tested them for fit, then we made adjustments and retested. We slowly worked our way around the whole door making sure that the lengths and miter angles were spot on. After getting all the 2x4s cut, we cut the insert to fit inside the frame. First we got the width right. We adjusted the other sides to fit the door we were making. Finally, we test fit it up and discovered that one of the boards was slightly too long. We shortened it a hair and got it to fit together well.
Assembly was a whole different beast, easier, but the devil is in the details and it was a race to the finish before the wood glue dried. The first thing we did was lay it all out in the dining room, where it was warm enough for the glue to cure properly. We planned our attack on where to put the pocket holes. Then we put the pocket holes into the individual pieces. We used a Kreg pocket hole jig kit for this, which made the process really easy. One thing we learned the hard way is that the long extension bit was really essential to getting deep into the pocket holes in a 2×4. We had a shorter bit and it really didn’t get the screw firmly seated in there.
Next we glued the 2×4 to the insert. We hammered them lightly into place and clamped them together using ratcheting tie downs. When we got it all glued we screwed all the corners together. On the top and bottom corners we added an extra screw coming straight up or straight down. This was in addition to the two pocket screws. We added this extra screw, because we were worried about the pocket screws being at an angle and tweaking the miter joint as it pulled tight. We also used the clamp from the pocket hole kit to clamp the joints together to keep them even while we screwed them together. This whole process seemed to work fairly well for us. It took a while because it was our first time. Next time, I would anticipate it would go quicker and smoother.
On a complete and utterly pointless tangent, I want to talk about the cordless drill and impact driver kit I got as a gift last year. They, along with the pocket hole kit are shown in the photos below. I’ve never used an impact driver before, so I can’t really compare it to other drivers, but this one is amazing. It is significantly better than a standard drill for driving in screws. It just seems to have more power and more control. Combined with better bits (square drive, torx, or hex head) it is a very nice experience. I was standing on a ladder putting some screws into some metal trim on our barn and the screws went in so easily even with outstretched arms and little leverage. I really don’t think I can go back to slotted or phillips screws. Plus when you have a drill and a driver, you can use the drill as a drill and the driver as a driver, without messing around with changing bits all the time.
Back to the door though, the last time I saw it, it was sitting in my mom’s dining room letting the glue dry. In the near future, my grandpa and mom will hang the door in the greenhouse and install the door handle. I promise to put some pictures up once they get it hung as I feel like the door may have that cute cottage feel going on.
Thanks a lot of for checking in on our progress. We appreciate it a lot.


Why we chose to build a winter greenhouse
There are many reasons why we chose to start building a winter greenhouse, but they really boil down into three categories: Quality of food, food independence, and the desire to contribute towards a positive change in our society.
My family lives near Montevideo, MN. The quality of food there is ridiculously low. There are exceptions, as there are some CSAs around, but they are exceptions rather than the norm. The food is of the same quality as all low end grocery stores, which is to say that if the produce looks good, it’s loaded with chemicals, and if it says it’s organic, it looks like you wouldn’t want to eat it. All of it lacking taste and nutrition. All of it shipped in from some place like California, Mexico, or Chile. Like the majority of our nation’s prime farmland, Montevideo imports most of it’s food, which is completely unacceptable.
In the summer, we can grow our own food in our gardens. In the winter, however, we are entirely dependent on the importation of most of our food, although preserving our food does help some, there is no substitute for fresh. If we allow ourselves to be dependent on imported food then we are tacitly resigning ourselves to subpar foods. A greenhouse of this size coupled with root crops grown in the garden during the summer, can provide enough food for 15-20 families during the winter months as is evidenced by the Fords greenhouse, which is situated in Milan, MN not too far from my Mom’s house.
The lack of quality food, that is nutritious and free of toxic chemicals, inevitably results in a variety of health related problems. This is clear, both in society at large and within my own family. Growing our own food keeps our money at home in our own community and out of the pockets of large agribusiness companies who profit at the expense of the farmers, consumers, and the Earth.
The winter greenhouse, while not new, is still a fairly young concept that has not permeated into the mainstream consciousness. This blog is partially devoted to helping raise awareness of this tool. I truly believe that every farm or homestead in the Northland should have one, but that remains an intellectual construct that I’d like to cement with life experience. Also, as the economy toughens, this greenhouse at the least will provide for the reduction of the amount spent of groceries and provide a constant food source should times get really tough. At it’s best, it could provide a high quality food source for others and small income for us.
Other options for season extension
There are many other options for season extension including high tunnels/hoop houses, low tunnels, heated greenhouses, cold frames, raised beds, etc. We chose to go the passive solar greenhouse route for a couple of reasons. I’ll probably be proven wrong at some point, but I’m of the belief that it will get us the hottest temperatures in the dead of winter. Most of the other options aren’t insulated and don’t insulate the ground and as such can’t keep it as warm in the cold weather. Of course, a heated greenhouse will be the hottest, but on a small scale, the extra fuel costs will eat up all the benefits, especially in the beginning. One of the most important reasons to us for choosing a passive solar greenhouse though is psychological. The weather in Minnesota in winter is a bleak, desolate place. A warm, sunny greenhouse is a tropical oasis by comparison. It is a place where life flourishes and one can read a nice book while basking in the sunlight.
Key design features of a passive solar greenhouse
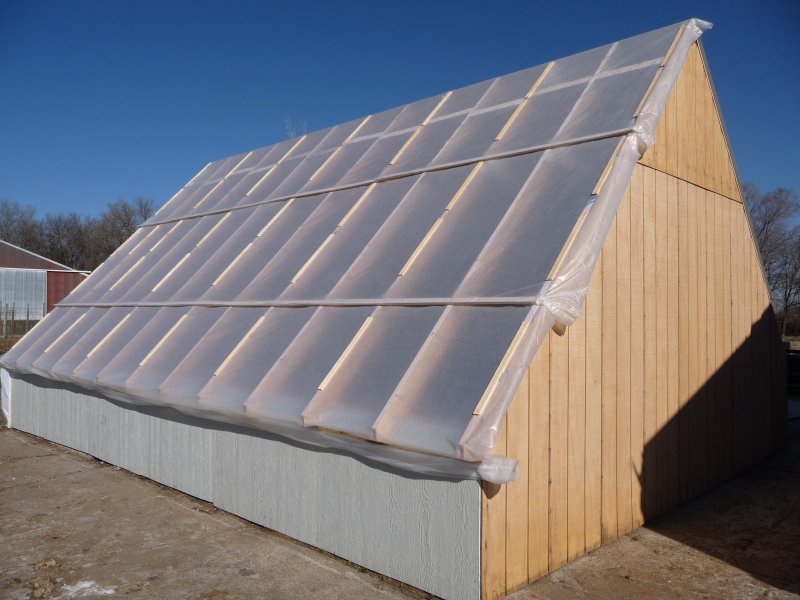
The design of a passive solar greenhouse differs greatly from that of a regular greenhouse, due to the winter environment that it will operate in. In the summer, the weather is warm and the sun is overhead. In the winter, the weather is cold and the sun is low in the southern sky. The passive solar greenhouse is glazed only on the areas of the greenhouse that will receive direct sunlight. The rest is insulated to prevent heat loss. The angle of the roof is important as you want to maximize the direct sunlight you allow into the greenhouse. Another interesting design choice is the ration of the length to width. Many people recommend a 2:1 length to width ratio or greater because if you get smaller than that the end walls will shade the plants for too much of the day.
Our design and why we did it as we did


One of the things that is the most unique in our design as opposed to others we have seen on the Internet is that ours is built on a floating slab of concrete. Most people build theirs over a dirt floor so they can plant directly into the ground. We had an existing slab where a barn used to be that already had water and electricity run to the area. It was too good of a deal for us to pass up as it spared us from all the groundwork associated with building the foundation and bringing in water and electricity. We will have the unique challenge of trying to insulate the floor. Most people instead choose to insulate the foundation. I’ll elaborate more on that distinction at some later time. Ideally, for our latitude, we would want an the slope of our glazing to be 55 degrees to maximize the solar gain during the coldest parts of winter. We chose 45 degrees as the slope of our glazing. This seemed the best compromise for us. It simplifies the construction process for us amateurs. It also means that we’ll get slightly worse performance in the coldest parts of winter, but we’ll get better performance in the other winter months, which will enhance the season extension properties of the greenhouse. When you look at our drawings you’ll see that the greenhouse is divided into 2 rooms. The larger Southern room is the insulated growing room. The smaller Northern room is a storage area. We added the storage area room for a couple of reasons. The first is that it acts as a double door entryway to the greenhouse. This prevents any cold winds from blowing into the greenhouse space while entering and exiting. The second is that it simplifies our construction. The saltbox shape of the growing room is intentional as it reduces shade that would occur as the sun moves higher in the sky. Adding a room to the backside made the design of the rafters symmetrical. This had the side-effect of moving the edge of the North roof closer to the ground, which greatly eased the roofing process. A third benefit is that it offers an area for storage that is outside of the growing area. This will help keep clutter out of the growing area and maximize the area that is useable for plants. The greenhouse is 24′ long and 18′ wide. Of that, the growing room is 24′ by 12′ which follows the 2:1 ratio preferred for passive solar greenhouses.
The greenhouse for my family is interesting in the sense that it has been a catalyst in conjuring up our imaginations. My mom is having visions of salad greens running through her head, and I’m having visions of a project completed and full of utility. I think she’s wanted a greenhouse for a long time, and is excited about getting one when she wasn’t expecting it. Also given that it’s at her house, I feel progress for her is moving really slowly, since she sees it standing still so often. I’m really excited about the possibility that she could be entirely self-sufficient food-wise in the near future and could be providing the rest of my family with quality food and nutrition not too far after that. This weekend we will be returning to the farm to build the external door, and will post on that when the opportunity arises.

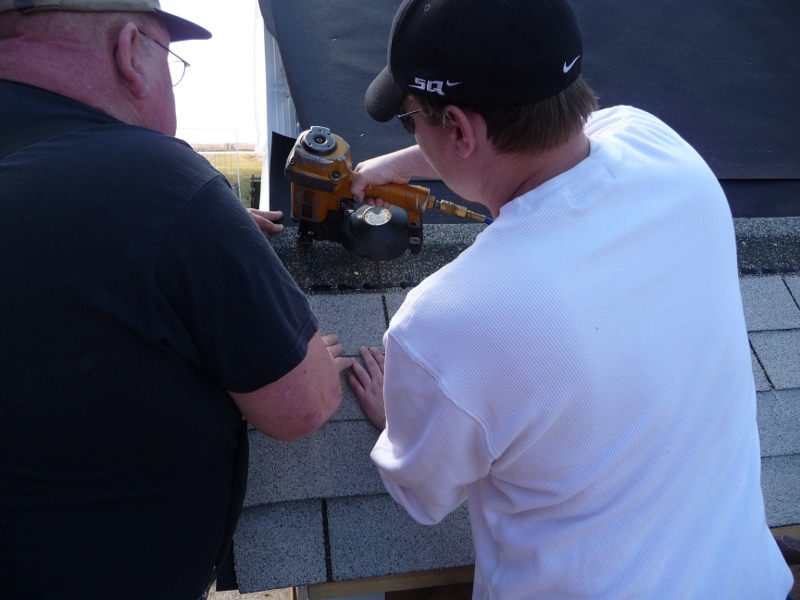
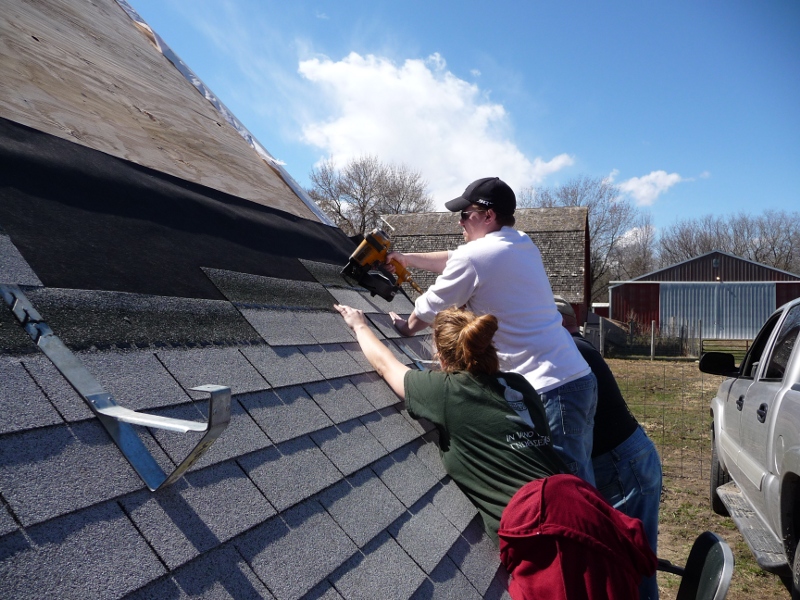
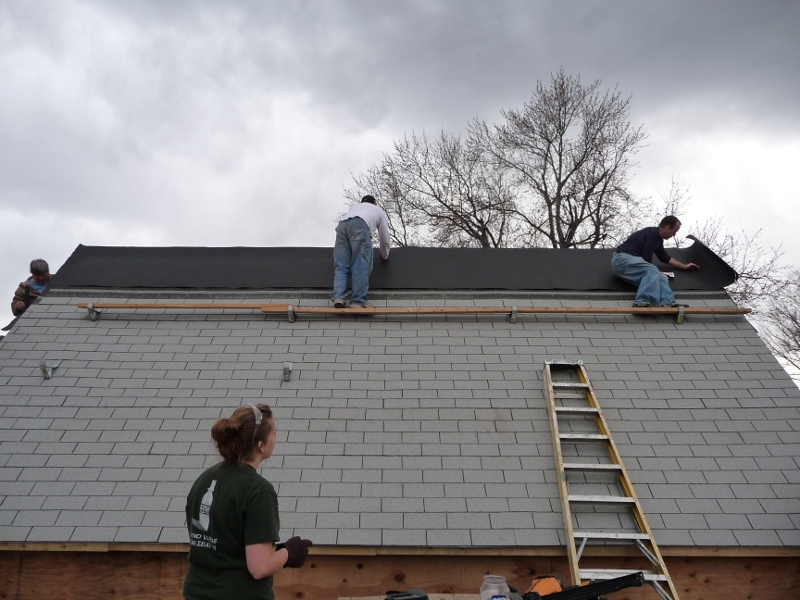
This weekend, we completed a major milestone on our path to completing the greenhouse at my mom’s house. With much help from Brad and Nikole, my sister and her boyfriend, we finished shingling the North roof. It feels great that it has the extra layer of protection from the elements and even though its external door isn’t complete (our next project) and it isn’t insulated, it still reaches 20 degrees above ambient in the afternoon.
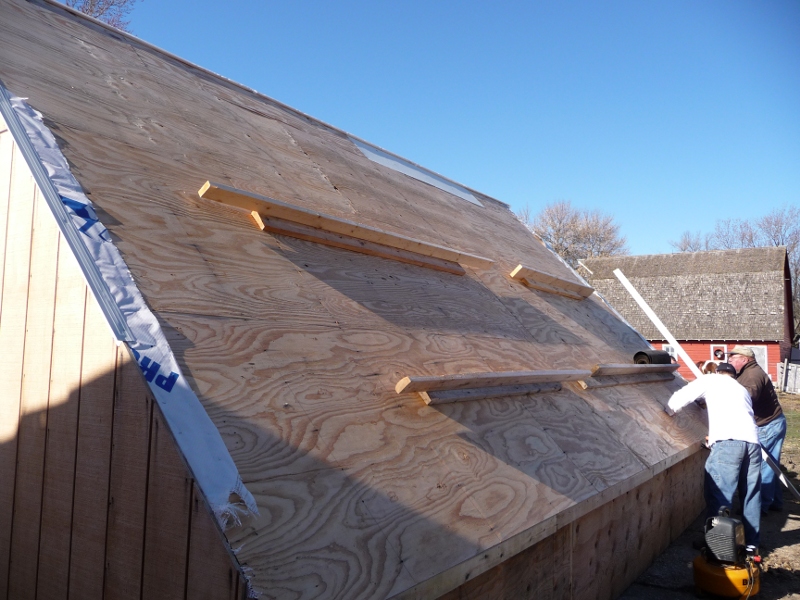
The North roof is constructed in a very conventional manner. If you were looking for a guide on how to replicate our work, you could find it easily by Google searching for “how to shingle a roof”. This was the first time we shingled, and while we learned a lot in the process, it was a very manageable task for someone who hasn’t done it before. We decided to use plywood for the sheathing as opposed to some form of OSB as we new it had the possibility of being exposed to moisture, both because it was going to be left exposed for a period of time, as I only can come out to the farm every couple of weekends or so, and because it will possibly be exposed to higher than average levels of humidity from inside the greenhouse. OSB is more sensitive to moisture and we wanted to avoid that. We covered the edges with drip cap, followed by tar paper and shingles. One thing that was a huge benefit to us was the fact that the edges of our roof are a mere three feet off the ground. That makes it much easier to work on and less intimidating for us novices, especially on a 45 degree roof. There were two things that made it much easier for us that our lumberyard provided for us, were a roofing nailer and roof jacks. You can see the roof jacks in the pictures below holding Brad up while he’s shingling. You nail them to the roof and then shingle over them. When you are done you remove them and pound the nails in the rest of the way.
A common question I’ve been getting is with regards to why half the roof is covered when all other winter greenhouses are glazed on all sides. Passive solar greenhouses, or winter greenhouses as they are also called, are optimized for winter usage. In Minneapolis and Montevideo, MN, where we live, the winter sun is at a low enough angle that the northern roof is shaded by the peak and contributes very little solar gain to the building. By insulating the North roof instead of using glazing, the heat loss out of the surface is dramatically reduced and the building will remain much warmer.
What we’ve accomplished so far
What we’re going to do in the near future


 Hi, I'm Nathan Maus and I'm striving to take full responsibility for creating the world I want to live in. I created this website to share with you what I've learned.
One of the big projects I'm working on right now is the construction of a winter greenhouse, built using passive solar methods. My passion leads me towards local, nutrient-dense foods and the restructuring of our social-political-economic systems to better benefit all of us.


